


")

")

")


")

")

")


Features & Benefits:
- Install applications: T-bar ceiling or suspended down from a hard ceiling
- Save 30-70% compared to gas, propane, oil or other electric systems
- Hardwired for 120, 208, 240 or 277 volts.
- Use with traditional or Wi-Fi controls
- Far infrared spectrum (FIR) heater
- 10-year warranty
- NOTE: Does not plug into a 120-volt electrical outlet.
- Controlled with hardwired line voltage or low voltage thermostat
- Reaches full heating potential in 5 to 7 minutes
- C UL US certified
- 10-year Limited Warranty
- Made in the USA
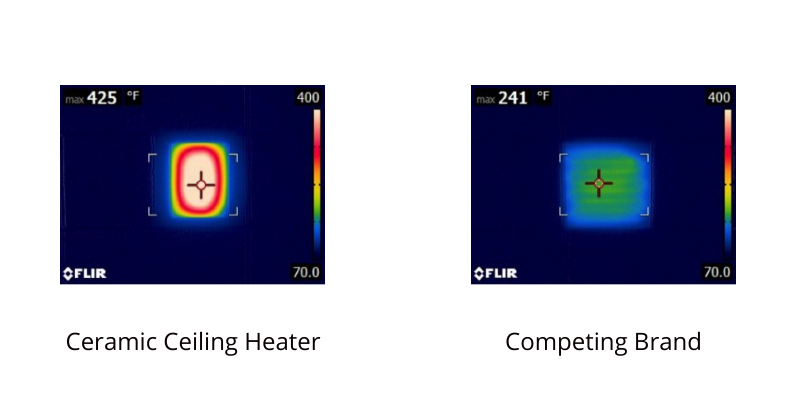
Heat Comparison
The ceramic ceiling heater warms a room faster and can reach higher temperatures than other radiant T-Bar ceiling heaters on the market. It also heats a greater amount of surface area than the compared heater. Look below for a thermal comparison between ceramic ceiling heater and a competing brand’s lay-in heater.
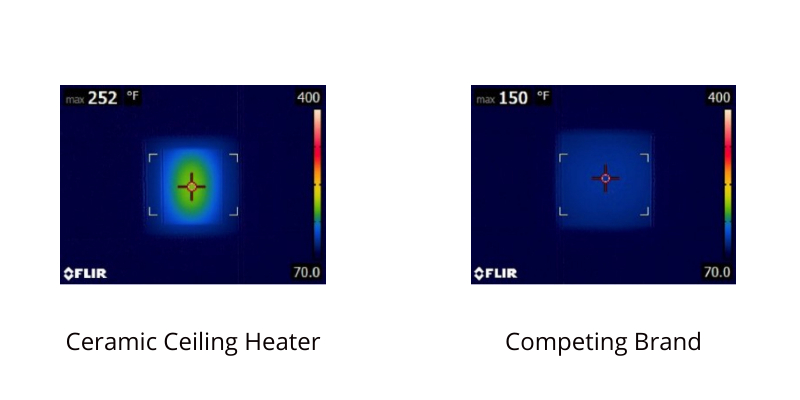
Heat Retention:
Once the room is heated to the desired temperature the ceramic ceiling heater turns off. After being turned off for five minutes, the ceramic surface temperature is higher than the compared heater’s surface temperature which had operated continuously for ten minutes. See the comparison below:
Yoga Studio Application
1: Our yoga thermostat allows you to obtain the high temperatures hot yoga studios desire.
2: Panels mount right into the ceiling and give sun-like warmth to the people and objects below.
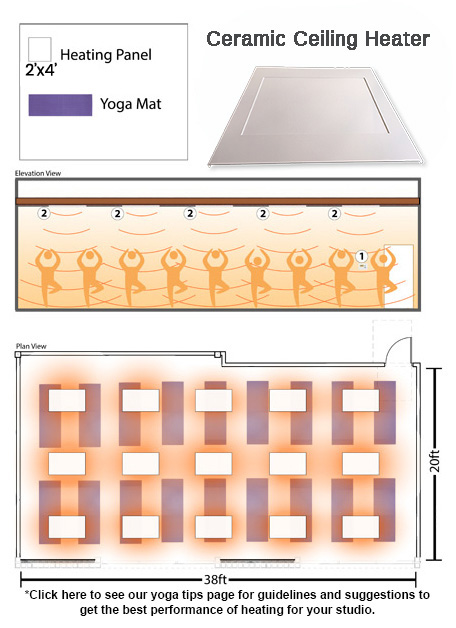
In this example, a 760 square foot yoga studio is heated by (15) 2’x4′ 1,250-watt ceramic heating panels. The panels fit directly into a T-bar ceiling grid, commonly used in commercial spaces. They will warm up and heat the people and objects in the studio below to a temperature of 90-100+F depending on the building envelope, performance of the room, location, etc.
Specifications
Ceramic Ceiling Lay-in Specifications
| Size | Watts | Volts | Amps | BTUs |
| 24''x 24''x 1.25" | 625 | 120 | 5.2 | 2134 |
| 24''x 24''x 1.25" | 625 | 208 | 3.0 | 2134 |
| 24''x 24''x 1.25" | 625 | 240 | 2.6 | 2134 |
| 24''x 24''x 1.25" | 625 | 277 | 2.3 | 2134 |
| 48"x 24"x 1.25" | 1250 | 120 | 10.4 | 4268 |
| 48"x 24"x 1.25" | 1250 | 208 | 6.0 | 4268 |
| 48"x 24"x 1.25" | 1250 | 240 | 5.2 | 4268 |
| 48"x 24"x 1.25" | 1250 | 277 | 4.6 | 4268 |
- Lay In Ceiling Heater Product Information
- Lay In Ceiling Heater Install & Maintenance Instructions
- Lay-In Ceiling Heater Specifications
- Lay In Ceiling Heater 1624-1248-1648CL Spec and Cut Sheet
- Lay-In Ceiling Heater sprinkler head clearance
Documents
- Customer and Contractor Check List Requirements for Installation and Operation
- Lay In Ceiling Heater Product Information
- Lay In Ceiling Heating Green Infrared Installation Guide for Yoga Studios
- Lay In Ceiling Heater Install & Maintenance Instructions
- Lay In Ceiling Heaters Installation Best Practices
- Lay In Ceiling Heater Specifications
- Lay In Heater Submittal Sheet
- Lay In Ceiling Heater 1624-1248-1648CL Spec and Cut Sheet
- Lay In Ceiling Heater Manual
- Lay In Ceiling Heater Manual in French
- Lay In Ceiling Panels Sprinkler Head Clearance
- Lay In Heater Ecobee Wiring Diagrams
- Lay In Heater Infrared Yoga Operation Guide and Troubleshooting
- Lay in Heater Radiant-Electric-Heat-Ten-Year-Limited-Warranty
- REVIT (CAD) file
Installation
How Much Insulation Do I Need?
When it comes to insulation we typically tell people that more is better. Having more insulation and higher R-values will help retain warm temperatures in the winter and cool temperatures in the summer so you’re saving money on energy costs year-round.
Click here to find the insulation minimum requirement in your state and county.
In the average American home, 45 percent of the utility bill can be attributed to heating costs. With proper insulation, you can decrease your heating bill while increasing the warmth and comfort in your home.
There are some general guidelines that outline how much insulation you should have in your space. Things like your location, elevation and average temperature range will play a big factor into how much you should insulate. A home in Phoenix, AZ is going to require less insulation than one in Buffalo, NY. The following map and chart from the U.S. Department of Energy provide a good guideline for how much insulation you will need in your area. You can also click here to find the minimum insulation requirement in your state and county.
Types of Insulation
The market is so flooded with options for insulation that deciding on one can be a daunting task. However, exploring the features and benefits of each can help narrow the choices down. Ultimately, it will come down to what will fit in your space, your budget and what R-values you need. Generally speaking, we suggest getting the most insulation you can. When it comes to insulation, more will always help maintain your desired temperatures and keep your heating bills down!
 Batts – Batts are one of the most common types of insulation due to their ease of installation and relatively low cost. They are made to fit between joists and rafters. Batts insulation typically comes in blankets or will and can be made of a variety of materials such as fiberglass, wool, cotton and even soy. It’s a great choice for DIY projects.
R Values – 3.0-4.0 per inch (Depending on Material)
Common Uses – Walls, Foors, Ceilings
 Blown-In – Blown-in or loose-fill insulation consists of fiberous strands of fiberglass or cellulose that are blown into ceilings or walls with a special machine. This type of insulation can be installed as a DIY project with rented equipment or you can hire a professional.
R Values – 2.2-3.8 per inch (Depending on Material)
Common Uses – Walls, Ceilings
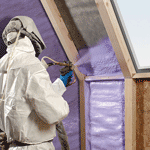 Spray Foam – Spray Foam insulation is a type of liquid that expands into a foam when applied. It can be sprayed into walls, floors and ceilings and will fill those hard-to-reach nooks and crannies. While spray cans of foam insulation can be bought for insulating very small areas, such as around pipes and windows, professional installation is needed for larger applications.
R Values – 3.5-6.5 per inch (Depending on Material)
Common Uses – Walls, Foors, Ceilings
 Structural Insulated Panels (SIPS) – SIPS consist of an insulating material, such as foam, sandwiched by particle board sheets. These sheets typically come in 4’x8’ configurations and are most often used for new construction. They are great due to their ability to insulate an entire wall, but can be expensive to install and to not lend well to remodels or retrofits.
R Values – 3.8-7.7 per inch (Depending on Material)
Common Uses – Walls, Ceilings
Where to Insulate
For optimal efficiency, your home should be insulated from the attic ceiling to the basement floor. For tips on where to concentrate insulation consider this graphic from the Department of Energy.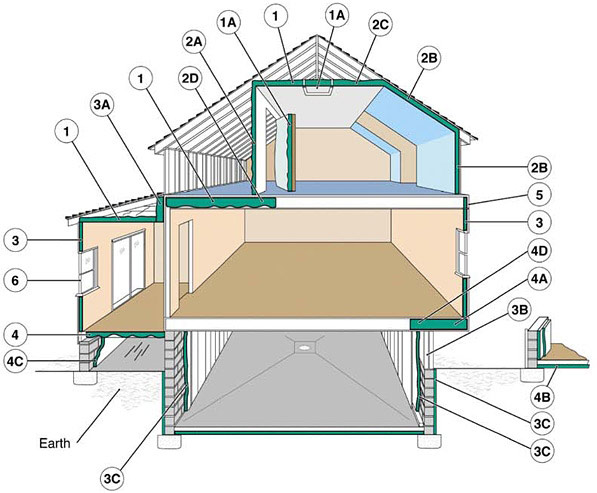
- 1: Unfinished Attic – Insulate between and over the floor joists and around attic access door (1a).
- 2: Finished Attic – Insulate between studs of knee walls (2a), between studs and rafters of exterior walls (2b), and ceilings with cold overhead spaces (2c). Extend insulation into joist space (2d).
- 3: Exterior Walls – Insulate walls between rooms, garages, storage areas (3a); above ground level foundation walls (3b); foundation walls in heated basements (3c).
- 4: Floors – Insulate floors above cold spaces such as vented crawl spaces and unheated garages. Also insulate floors cantilevered beyond the exterior wall below (4a); slab flors built directly on the ground (4b); foundation walls of unvented crawl spaces (4c). Extend into joists (4d).
- 5: Band Joists
- 6: Windows & Doors– Seal and caulk around windows and doors.
Seal Air Leaks
Another key component to properly insulating your home involves making sure it’s well sealed. Air leaks around plumbing vents, doors, windows and other culprits allow cold air to enter, and heated air to escape your home. By sealing these areas, you can improve your heating efficiency. The following image from energy.gov shows some areas prone to air leaks.
Do a Blower Door Test
 You can test for air leaks in your home by doing a blower door test. A professional energy auditor will place “blower door” in your doorway. This is an instrument containing a fan that pulls air out of your home and a series of gauges to measure air pressure. This creates a pressure gradient between your home and the air outside, which allows the auditor to pinpoint air leaks in your home. This is illustrated by the graphic to the right, provided by energy.gov.
Energy Tips
Our heating products are a great start to conserving energy, but there is always more you can do to keep those utility bills lower.
Use a programmable thermostat – You can program these to turn your heaters on and off at set times. For example, you can set them to turn on before you get up in the morning, shut off while you’re at work and turn back on before you get home in the evening.
Insulation is key – Any heating or cooling system will perform best when well insulated. To get the best performance out of your heaters make sure your space is properly insulated. For more on how to insulate your home check out this link from energy.gov
Reduce drafts – Air leaks around plumbing vents, doors, windows and other culprits allow cold air to enter, and heated air to escape your home. By sealing these areas, you can improve your heating efficiency. The following image from energy.gov shows some areas prone to air leaks.
Sizing and ordering to delivery was great
customer service is always the best. quick and to the point replys and help!
Great to deal with. Easy order.
Had some issues with installation that they were super supportive
Always helpful and courteous.