Ohm Test Steps
Troubleshooting/Warranty Guide
If you are troubleshooting a cove or ceiling heater by REH CeramiCircuit, follow the new troubleshooting steps below to be eligible for warranty, see the form at the bottom of this page.
NOTE: These steps are required by our manufacturer, Radiant Electric Heat, to be eligible for a warranty replacement. Any incomplete warranty requests will not be considered by the manufacturer.
NOTE: These steps are required by our manufacturer, Radiant Electric Heat, to be eligible for a warranty replacement. Any incomplete warranty requests will not be considered by the manufacturer.
What, Why and How to Perform an Ohm Test
What and why is an Ohm test needed? Good questions! The Ohm test shows us how the element inside the heater is functioning. Elements that show an OL or open loop reading mean that the continuous circuit has been disrupted and replacing the element will make the heater work. Replacing the element instead of replacing the entire heater is similar to replacing the lightbulb instead of having to buy an entire lamp!
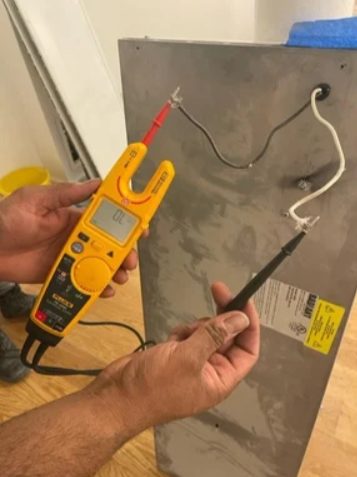
How to perform an Ohm test.
- Remove the heater from power and remove from mounting to access the leads in the junction box on the back
- Use the multimeter in the correct range for resistance mode Ω, and attach the probes to the the black and white leads from the heater
- An OL (open loop) or Infinity reading qualifies for a warranty replacement element (or heater in some circumstances)
- Take a photo of the Ohm test reading on the multimeter with the black and white leads to pass along to Heating Green along with the warranty request for the element!
PLEASE NOTE: If multiple heaters are affected, we will require further troubleshooting as issues with multiple heaters are caused by environmental factors.
For the basic installation checklist, click here.
For questions about what Heating Green assists with, visit Who We Are and What We Do.